Thursday, February 21, 2013

DIY: Burlap and Burns -- Saw It. Pinned It. Did It.

Well here it is, 10:17 p.m. on Wednesday night, and I'm writing this post. Nothing like a little last minute posty for you girls, right?! Right!

First things first -- can I just tell you how giddy this made me?
I know, I know...it isn't anything huge, I'm not a 3000 follower blog,
but hey...considering my posting schedule isn't FAB...it made me smile! :)

Now, back to how it's pretty late the night before the SPD Linkup....oh yeah,
I definitely have burns from the hot glue gun all over my fingers. Owie!

You will need:
-Styrofoam wreath form
-1 roll of burlap (depending on how full you want your wreath)
-Scissors
-Hot glue gun
-Wooden letter
-Acrylic paint
 (this may have been a pic I texted my mom...ha)

I got my original idea from none other than Miss Katie herself:

Sadly, I started this wreath almost 3 weeks ago. Following directions from Katie, I cut many, many pieces of burlap appx. 8 inches long. I started pulling an end string from the middle of the strip, creating "gathers" in the burlap. It required pulling several of the strings to get the burlap strips scrunched up quite how I liked them.
Now, unfortunately, I failed to read Katie's directions thoroughly on the next step, when I started gluing on my bunches of burlap. She glued on two rings, one somewhat closer to the center and layering another around it. I overlooked that step (oops) and started off just gluing my bunches to the face of the wreath.
(Evidently I am tired. I just typed "glying" for gluing, and "reach" for wreath)

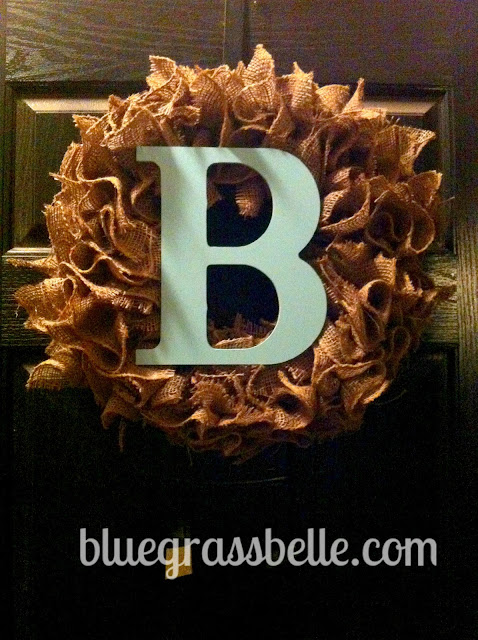
Even with just one ring of burlap, it still looked pretty decent. 
 And it was at this point that I cleaned off my table and walked away from the wreath for nearly three weeks. Oopsie.
Tonight I came back to it, so I'd have something to post tomorrow.  Yeah I said it.
I cut some more burlap strips, created the bunches, and started gluing them closer to the outer edge. I had to put them close to the existing burlap because, as I said, I failed to read instructions and do it right the first time.
 You'll notice I cut many of the loose strings from the burlap, though I think Katie left some of hers. I chose not to do this, because my wreath will be outside (we don't have a glass storm door), and there's a bird that likes to build a nest on my porch. I figured a bunch of loose burlap strings would encourage her to pull them loose for her nest!

After this, I glued on my painted letter. It's a light turquoise/aqua blue color, nice for spring?
There weren't a ton of font choices, so I decided to go with this...
(In looking at these pictures, I can't decide if my wreath is fuller on the right side, or if
my letter is just a bit catty-wompus...)
This wreath is super easy and fast. Fast, assuming you don't leave it half-finished for 3 weeks ;)

Go forth my crafty bloggies! Make something fun,
and don't forget to link up with Stephanie and Katie!

Thursday, January 17, 2013

DIY: Coffee Lovers Printable -- Saw it. Pinned it. Did it.

Welcome back, SPD'ers!

I had a lot of fun with last week's post and was excited to participate again this week!
(Even if I did wait till the last minute)
From the moment I saw this (below) on Pinterest, I loved it.
However, it's only an image. And not a very high quality one, at that.

I thought this would be adorable, framed of course, in my kitchen.
So I set about to make something similar!

I knew I needed to "replicate" the coffee stains, so I googled "Coffee Stain Brushes, Photoshop" until I found a free set of brushes. Unfortunately, because I downloaded several brush sets, I'm not sure exactly where they came from in order to link to the source. Free brushes are pretty easy to find, and as long as you run a virus scan on the file you download, you should be okay.
Ultimately, here is what I created, which I printed at home on kraft cardstock.

I stopped by Michael's for an inexpensive frame, with the original idea to paint it. I picked up a light robin's egg blue shade of acrylic paint, and a cheap brush. Here's what happened that made me understand just WHY EXACTLY my dad always uses spray paint!

 Try as I might, I couldn't really get rid of the streaks, or make them look "intentional" enough to live with it. So I scrapped the plan of paint (at least for this project) and scrounged around my house until I found another frame I could use.

I knew I wanted to put this near my coffeemaker, preferably on the wall, but our backsplash is tiled. I was not about to hammer or screw into that and ruin it. So I found (and by found, I mean I asked TJ) some adhesive velcro. I cut 4 small squares and placed them in each of the corners of the frame. I tried to line it up fairly well before sticking it to the wall. Here is the end result...
What do you think? I'm pretty happy with it! TJ even thought it was kinda neat!
(I expected he would think it was kinda silly, ha)
Also, I forgot to mention that this frame is for a 5x7 print (if you hadn't already guessed).
But that's not all, bloggies! I thought I would be kind and generous this week.
Are you a fellow coffee lover? Interested, perhaps, in the "coffee" print I made?
Like I mentioned, it is not an entirely original idea.
That said, I thought I'd share the link with you.
Download my "Coffee" printable here (pdf)!

If you have any questions - don't hesitate to ask!
Did you do a Pinterest or other DIY/craft project this week? If so...
be sure to link up with Stephanie and Katie for Saw it Pinned it Did It! I can't wait to see your projects!

Thursday, January 10, 2013

DIY: Printing on Burlap -- Saw it, Pinned it, Did it. Success!

This week, I'm back for my second installment of Saw it. Pinned It. Did It.
And this time, ladies, I have a success story! Whoop Whoop!
 
My original inspiration came from this pin:
http://media-cache-ec3.pinimg.com/736x/65/f1/c6/65f1c6dfe1f623822e588d8170ac7c6d.jpg

However, my first attempt was a total flop, which you can read about here: Saw it, Pinned it, Did it. Almost. Following that "success," I decided to try the printing on burlap tutorial found here:
http://media-cache-ec4.pinimg.com/736x/0d/ce/68/0dce6864be1dbaed5dd2238aa28a919f.jpg
via
 
First things first....you'll need:
-Burlap (8.5x11 for this project)
-Scissors
-Iron
-Computer & ink-jet printer
-Freezer paper
 
This is the freezer paper I used, which I purchased via Amazon:

Let's get started then, shall we? Set up your iPad tutorial and ironing board and get to work!

There are two "sides" to freezer paper. One side is a bit more dull dull and the other side is more slick/shiny. Place the shiny side "down," touching the burlap (or the fabric you want the paper to adhere to). Once the paper is in place, run a medium-hot iron over the paper a few times, concentrating on the corners to ensure they are adequately adhered.

After you've ironed the freezer paper to the burlap, cut the excess from the edges, following the shape of the freezer paper. Remember, it has to be pretty close because it needs to fit into your printer. You don't want any loose edges to 'catch' on anything!
Once your burlap paper is ready, hey, now we're cookin' with peanut oil, Jack!
(Two points for those of you who got the reference to the best show on TV!)

In my original burlap monogram post, I told you to flip your letter. Forget everything we talked about last week, because this method is a lot easier! With this technique you don't need a mirror image--what you see on screen is exactly what prints out!

(Also, not shown below, but I put the burlap "face down" in my printer. The feed tray on your printer should help you determine the optimal way to load the burlap paper.)
Once you're ready, hit print, cross your fingers, say a prayer, and hope for the best!
Ta-da!
The black is not as dark or as saturated as I might have IDEALLY liked....but I can live with it!

I've yet to decide where this will ultimately "live," but for the time being, I placed it on this trunk with my little birdie. It's easily visible upon walking in the front door of my house.
Notice the difference in the photos above? iPhone vs. Canon digital SLR. I've been trying to use my Canon a little more lately. Even if it is just for blogging! :)

I hope this "tutorial" of sorts helps you out if you decide to try printing on burlap. If you have any questions, feel free to leave them in the comments and I'll do my best to answer!
Don't forget to link up with Stephanie and Katie for Saw it Pinned it Did It!