

In February, I went to California for a work trip. At my hotel, I saw these prints, which I posted on Instagram hoping to glean some information!

I got exactly what I was looking for when "megspow" told me they were from Crate and Barrel. But with them being 3 years old, I'd either never find them, or they'd be a bajillion dollars.
So naturally I took to google, and found this, which I promptly pinned. I was going to make these bad boys!

I have a very big, very blank wall in my living room. For the past three years, I've been trying to find the "right" thing for the wall. See below. And please ignore the "lived in look." The squares on the wall are me trying to "envision" if this was going to work. Neither of us were really satisfied...

...so I changed my original plan a little and got to work.
You will need the following:
You will need the following:
- 12 x 12 x 2 board, cut into 8 squares. The squares are more like 11 1/8 inches, because the wood shrunk. (At least that's what the guy told me...but he cut them into squares with equal sides) If you can find a shorter board, that's great, but I couldn't. This was about $14 at Lowe's.
- Sandpaper. Free from TJ :)
- Paint for your squares. I chose a dark brown color (appx $10)
- Mod Podge or some other adhesive ($4)
- Some type of glaze. I chose Valspar tinted glaze (appx $10)
- Paper trimmer or scissors (and a really steady hand).
- Picture hangers (appx $8 for 10)
- Square Decals. I chose these, which are 11x11 and why I needed the trimmer. ($22)
If I'd looked harder, I would have found these, which are 10.5 x 10.5 and included 9. If you don't like the geometric look, they have several others: venetian look, vintage butterflies, or any of these :) (I actually might buy the venetian looking ones, for when I tire of the geometric look!)
If you have a lot of patience and don't wish to buy the decals, you can probably achieve the same look using various paint colors and painters tape. I am not that patient though.
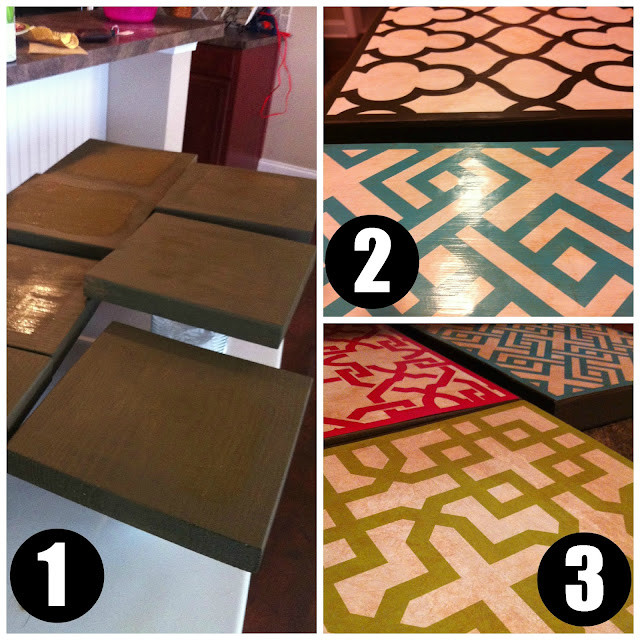 1 - After sanding the edges and surfaces, paint your squares. Choose whatever color you want!
2 - Apply the decals. Attempt to put them on as straight as possible. They are not very sticky. After you've got them laid, lift up one edge at a time and brush on some mod podge to help them stick to the wood. Be sure to completely smooth the decals back down on the wood to avoid any air bubbles or wrinkles. Go over the edges too. Allow them to dry.
After they've dried, apply mod podge to the top. Do not do what I did and brush it on because it is streaky (see photo!) Instead, bunch up a paper towel and "blot" the glue on. Use a really light hand! Too much will cause bubbling after they've dried.
3 - After the glue is dry, do your "finishing" technique. I guess this step is not absolutely necessary, but I didn't like the stark white background of the decals. Again, I used a bunched up paper towel to blot the glaze on to avoid streaks. It is darker in some places than others and that's okay. I barely used any glaze.
The next step is to add your picture hangers to the back. I don't have a picture of this step, but I placed them about one inch down and in the center of the squares. Thankfully, I'd left the squares of cardstock on the wall, so I measured this same spot on them and used it to get my nail started. This technique worked pretty well because I only ended up with one extra hole in the wall. If that doesn't work for you, try Stephanie's toothpaste trick.
This is my final result:


Total DIY Cost: About $68
The mirror is what I meant when I said I "changed my original plan a bit." TJ and I both felt like the 8 squares alone would still be a little overwhelmed by the size of the wall, so I found the mirror and decided to add it to the mix. It is available on Overstock, and shipped quickly.
All in all, I'm pretty pleased with the final outcome! This was the most expensive DIY I'd ever taken on, so I was really nervous and tried to take my time. A few notes...


2 - Apply the decals. Attempt to put them on as straight as possible. They are not very sticky. After you've got them laid, lift up one edge at a time and brush on some mod podge to help them stick to the wood. Be sure to completely smooth the decals back down on the wood to avoid any air bubbles or wrinkles. Go over the edges too. Allow them to dry.
After they've dried, apply mod podge to the top. Do not do what I did and brush it on because it is streaky (see photo!) Instead, bunch up a paper towel and "blot" the glue on. Use a really light hand! Too much will cause bubbling after they've dried.
3 - After the glue is dry, do your "finishing" technique. I guess this step is not absolutely necessary, but I didn't like the stark white background of the decals. Again, I used a bunched up paper towel to blot the glaze on to avoid streaks. It is darker in some places than others and that's okay. I barely used any glaze.
The next step is to add your picture hangers to the back. I don't have a picture of this step, but I placed them about one inch down and in the center of the squares. Thankfully, I'd left the squares of cardstock on the wall, so I measured this same spot on them and used it to get my nail started. This technique worked pretty well because I only ended up with one extra hole in the wall. If that doesn't work for you, try Stephanie's toothpaste trick.
This is my final result:

Total DIY Cost: About $68
The mirror is what I meant when I said I "changed my original plan a bit." TJ and I both felt like the 8 squares alone would still be a little overwhelmed by the size of the wall, so I found the mirror and decided to add it to the mix. It is available on Overstock, and shipped quickly.
All in all, I'm pretty pleased with the final outcome! This was the most expensive DIY I'd ever taken on, so I was really nervous and tried to take my time. A few notes...
- I mentioned the decals might bubble up. This DID happen to me. However, I pulled them up enough to smooth out the bubbling, and smoothed them back down and brushed a tiny bit of glue around the edges. I am somewhat concerned this might be an ongoing problem... :-/
- The first batch of decals I ordered from Lot 26 had damage to three of the squares. I contacted them, and they sent a replacement set, no questions asked. YAY for awesome customer service! This delayed me on the project because I had to wait, but that's okay. It turned out in the end!
