Showing posts with label House. Show all posts

Friday, July 11, 2014

DIY: My long list of projects

If you were a reader of my blog before I became pregnant, you know I love me a good DIY! I say "before I became pregnant" because lately, many of my posts are weekly updates or pregnancy related in some way. I am fully aware that I haven't been that great of a blogger these last couple months, so I apologize!

I have a lot on my list for these next few months in terms of completing the nursery, doing things around the house, etc., but there are still some crafty DIY projects I'd like to accomplish before baby arrives and my time is more limited. I thought I'd share some of them...

1. Re-cover my corkboard
I have a plain-jane corkboard that I want to re-do, Ballard-burlap-style. I am confident I can acheive this look for less, I just need to get around to it! This past weekend, I purchased my supplies, and I plan to use these two tutorials to help me finish the job...


2. Chalkboard Charger
I have had all of the materials to create this for months. I really have no good excuse for why I haven't done it!

3. Burlap Bed Skirt
I need a new bed skirt for our guest bedroom. (Do you say bedskirt or dust ruffle?!) The bed is full size and has a pretty quilt on it, but no bed skirt at the present time (you may have noticed here). I finally threw it away after the "skirt" portion had ripped in multiple places from the white part that laid flat on the box spring (if that makes sense?). Anyway, I've seen DIY no-sew, "easy" bed skirt tutorials on Pinterest, so I might give one a shot. We'll see.
via Styleberry Blog

4. Painted Pantry Door
Our pantry door is side-by-side with the door into our garage, so obviously I can't do one without the other. However...I'm not entirely sure that TJ will be down for this! I might have to do this sometime while he's traveling for work and surprise him with my finished project (would that be completely terrible of me?!) 

5. Curtains and pillow
I've had this pinned for awhile, and there are actually two things in the image below that I'm loving! She PAINTED these curtains using drop cloth and a stencil. I "need" (okay, want) a set of curtains for my dining room and this sounds like an awesome idea. However, I don't know if I'm suited to get down on the floor and paint them right now! Hmm. Anyway. The pillow on the chair is also one she made. I'd love some new throw pillows for my living room and this fabric is nice...butttt I may be too lazy. Home Goods might have something to fit the bill ;)

Even though I love getting crafty, that's probably enough on the list for now. Two smaller (more realistic) projects, and two larger ones. We'll see what I'm able to accomplish over the next few months! 

I did recently complete a flag pallet for my mom, which I don't think I shared here. Like the terrible blogger that I am, I forgot to take a picture of the finished product before I gave it to her. However, she posted this picture on her facebook page.

It's a good thing I didn't inherit her photography skills.

Wednesday, July 9, 2014

Before-Baby Checklist

We've had plenty on our list in terms of "house" projects for quite some time, and there's nothing like a baby on the way to give us a kick in the pants to get some things done! Fortunately, we've been checking things off the list a little at a time over the last month or two...but of course, for every item checked, it seems like I add something else!

Here is my list of various things, not necessarily in the order of which they are to be completed...
(I'd love to put them in order but momma ain't got time for that)

1. Order crib & baby furniture 
Munire Furniture

2. Drywall repairs 

3. Interior house painting, including nursery 

4. HVAC work upstairs - humidifier, new duct work, install return vents 
Don't get me started on this. What idiot builder finishes a house with no return vents? Ours, evidently! This project should be finished up soon. They have a little work left to do in the attic,  but the humidifier and return vents are completed. This project was completed yesterday!

5. Remove existing furniture from guest bedroom, which will become nursery, thus moving the guest bedroom to what was previously known as the "junky room" 

We've moved the furniture, thankfully, and these furniture sliders from Lowes have been a Godsend! TJ lifts the furniture, I place the sliders beneath the feet, and then we just push-slide-n-guide the furniture to where we want it. This was the "junky room" on January 1st of this year...
from the post: Why do we make New Year's Resolutions?

...what an improvement!

(A new bedskirt & wall decor are on the list!)

6. Clean out closet in nursery-to-be
It's currently packed full of Christmas decorations, Christmas trees, and gift wrap, with a few random pieces of luggage thrown in for good measure!

7. Clean out closet in the newly relocated guest room
I've started on this task, but still have a LONG way to go!

8. Move items to attic to store (some Christmas items, etc.)

9. Clean carpet in nursery-to-be, following the completion of the HVAC/drywall/painting

10. Find and purchase bedding for nursery 
We selected the Harper bedding from Pottery Barn Kids.

11. Find and purchase a glider or rocking chair
Moms - Do you have one you recommend? It's really important to me that it comes up high enough in the back to support my entire neck and head when I lean back. However, I'd really prefer one that looks more like furniture and less "glider-like" if that makes sense...
The one on the left is from Babies R Us and the one on the right is by Dutalier.
I've sat in the chair from BRU and it does not provide enough neck support for my taste. The Dutalier chairs are super comfortable but I don't particularly love the look. I've sat in one chair that looked "my style" and it was really comfortable. It was from Pottery Barn Kids and costs an arm and leg, and I cannot really swallow the cost. I hope to find something I'm happy with SOON, comfort-wise and cost-wise.

12. Hang curtains in nursery
I have the curtains, but do not have a rod or other hardware. Buying that stuff should probably be another item on this checklist! Eek!

13. Outside - hang numbers on our porch

14. Change dining room light fixture
This is something I'd LIKE to do, but if it doesn't happen I'm not going to lose sleep over it!

15. Outside - install motion-sensing light on the side of the house

16. Clean out/organize kitchen cabinets to make room for baby products

Looking at this list makes me tired. TJ and I did a LOT of work this past weekend following the painting of our upstairs, and by Sunday night my bed had never felt so good! I was exchanging emails with my favorite pretty new-momma blogger Jess, and she told me to just get ready, because I'd be working up till the last day! Ahhh!

Thursday, April 4, 2013

DIY: Crate & Barrel Wall Hangings -- Saw It. Pinned It. Did It.


In February, I went to California for a work trip. At my hotel, I saw these prints, which I posted on Instagram hoping to glean some information!
I got exactly what I was looking for when "megspow" told me they were from Crate and Barrel. But with them being 3 years old, I'd either never find them, or they'd be a bajillion dollars.

So naturally I took to google, and found this, which I promptly pinned. I was going to make these bad boys!

I have a very big, very blank wall in my living room. For the past three years, I've been trying to find the "right" thing for the wall. See below. And please ignore the "lived in look." The squares on the wall are me trying to "envision" if this was going to work. Neither of us were really satisfied...
...so I changed my original plan a little and got to work.

 You will need the following:
  • 12 x 12 x 2 board, cut into 8 squares. The squares are more like 11 1/8 inches, because the wood shrunk. (At least that's what the guy told me...but he cut them into squares with equal sides) If you can find a shorter board, that's great, but I couldn't. This was about $14 at Lowe's.
  • Sandpaper. Free from TJ :)
  • Paint for your squares. I chose a dark brown color (appx $10)
  • Mod Podge or some other adhesive ($4)
  • Some type of glaze. I chose Valspar tinted glaze (appx $10)
  • Paper trimmer or scissors (and a really steady hand).
  • Picture hangers (appx $8 for 10)
  • Square Decals. I chose these, which are 11x11 and why I needed the trimmer. ($22)
    If I'd looked harder, I would have found these, which are 10.5 x 10.5 and included 9. If you don't like the geometric look, they have several others: venetian look, vintage butterflies, or any of these :)  (I actually might buy the venetian looking ones, for when I tire of the geometric look!)
If you have a lot of patience and don't wish to buy the decals, you can probably achieve the same look using various paint colors and painters tape. I am not that patient though.
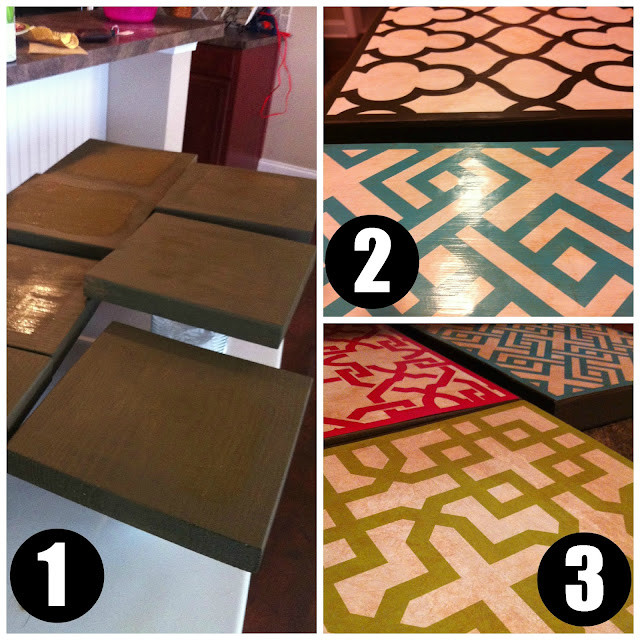
 1 - After sanding the edges and surfaces, paint your squares. Choose whatever color you want!
2 - Apply the decals. Attempt to put them on as straight as possible. They are not very sticky. After you've got them laid, lift up one edge at a time and brush on some mod podge to help them stick to the wood. Be sure to completely smooth the decals back down on the wood to avoid any air bubbles or wrinkles. Go over the edges too. Allow them to dry.
After they've dried,  apply mod podge to the top. Do not do what I did and brush it on because it is streaky (see photo!) Instead, bunch up a paper towel and "blot" the glue on. Use a really light hand! Too much will cause bubbling after they've dried.
3 - After the glue is dry, do your "finishing" technique. I guess this step is not absolutely necessary, but I didn't like the stark white background of the decals. Again, I used a bunched up paper towel to blot the glaze on to avoid streaks. It is darker in some places than others and that's okay. I barely used any glaze.

The next step is to add your picture hangers to the back. I don't have a picture of this step, but I placed them about one inch down and in the center of the squares. Thankfully, I'd left the squares of cardstock on the wall, so I measured this same spot on them and used it to get my nail started. This technique worked pretty well because I only ended up with one extra hole in the wall. If that doesn't work for you, try Stephanie's toothpaste trick.

This is my final result:


Total DIY Cost: About $68
The mirror is what I meant when I said I "changed my original plan a bit." TJ and I both felt like the 8 squares alone would still be a little overwhelmed by the size of the wall, so I found the mirror and decided to add it to the mix. It is available on Overstock, and shipped quickly.

All in all, I'm pretty pleased with the final outcome! This was the most expensive DIY I'd ever taken on, so I was really nervous and tried to take my time. A few notes...
  • I mentioned the decals might bubble up. This DID happen to me. However, I pulled them up enough to smooth out the bubbling, and smoothed them back down and brushed a tiny bit of glue around the edges. I am somewhat concerned this might be an ongoing problem... :-/
  • The first batch of decals I ordered from Lot 26 had damage to three of the squares. I contacted them, and they sent a replacement set, no questions asked. YAY for awesome customer service! This delayed me on the project because I had to wait, but that's okay. It turned out in the end!
Don't forget to link up with Stephanie and Katie to show us what you did this week!